This window of Loan Performer allows the user to enter the names of all the Geographical Areas where their clients originate or work from.
How to Add Geographical Areas
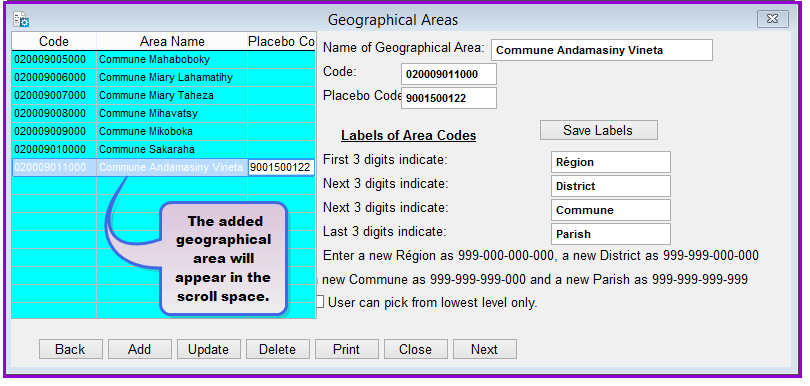
To add Geographical Areas you go to Support Files/Geographical Areas and a screen like the one below shows up:
Name of Geographical Area: In this text box enter the name or label for the new geographical area, e.g., "Commune Andamasiny Vineta".
Code: Enter the code for the area entered, e.g., "020009011000".
Placebo Code: Enter the 10 digit Placebo code e.g., "9001500122"
Note:
The placebo code is a code you enter manually yourself according to the institution's needs. It is different from the automatically generated code by LPF like one above. This will enable you to filter and analyze your loan reports by the placebo code you will have defined. For instance, the regulatory reports sent to the Central risk management of Bank of Madagascar require that you analyse and declare your financial information by the placebo code and not the LPF automatically generated code. For more information on this, go to Accounting/Regulatory Reports/Central Bank of Madagascar/Central Risk Management.
Labels of Area Codes: Loan Performer allows you to enter up to twelve digits representing four levels of geographical areas. The first 3 digits representing the highest level, e.g., "District", the next three digits representing the level that follows, e.g., "County", the next three digits also representing the level that follows, e.g., "Sub-County" and the last three digits representing the last and lowest level , e.g., "Parish".
NOTE: Geographic area codes are added starting from the highest level followed by subsequent levels in descending order.
User can pick from lowest level only: If you activate this checkbox, only the lowest level in the hierarchy will be displayed whenever a client is being added or modified. For reports all location levels are displayed.
Click on the Add button to add the new geographical area. This will be added and will appear in the Geographical Areas scroll space. Repeat this for all possible areas.
You can click on the Print command button to view\print the Geographical Areas labels and keep them for future reference or click on the Close command button to exit the menu.
Click on the Close button to exit the menu.
How to delete/modify geographical areas
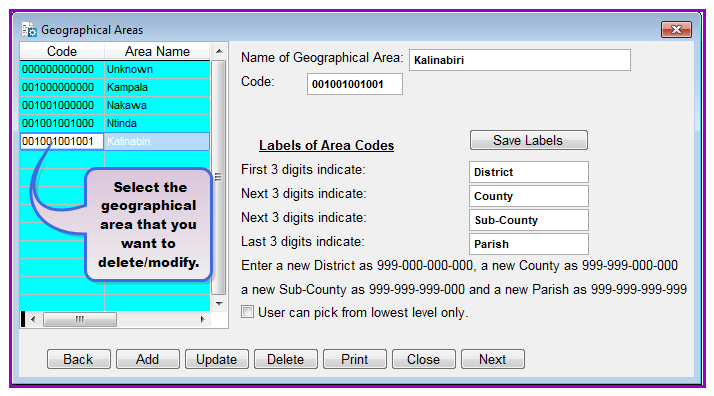
To delete/modify a geographical area you go to Support Files/Geographical Areas and a screen like the one below shows up:
From the list of the displayed geographical areas in the scroll space, click on the area that you want to delete/modify, e.g., "Kalinabiri". The variables for the selected geographical area will be displayed in the relativetext boxes.
To modify the area make the necessary changes and click on the Update button. To delete, click on the Delete button and repeat this for all areas that you to delete/modify. .